


In one of the articles, we studied techniques for converting Excel sheets to HTML. Today it seems that everyone is moving to cloud storage, so why are we worse? New technologies for sharing Excel data over the Internet are an easy way, with many features and benefits that you can use.
With the advent of Excel Online, you no longer need cumbersome HTML code to post spreadsheets on the web. Simply save your workbook online and access it from literally anywhere, share it with others, and work together on the same spreadsheet. Using Excel Online, you can embed an Excel sheet into a website or blog and allow visitors to interact with it to get exactly the information they want to find.
Later in this article, we will look at these and many other features that Excel Online provides.
How to Send Excel 2013 Sheets to the Web
If you’re just getting started with cloud services in general and Excel Online in particular, then an easy start would be to share an existing workbook using the familiar Excel 2013 interface on your computer.
All Excel Online sheets are stored in the OneDrive (formerly SkyDrive) web service. As you probably know, this online storage has been around for a while now and is now integrated into Microsoft Excel as a one-click interface command. In addition, guests, i.e. other users with whom you share your spreadsheets no longer need their own Microsoft account to view and edit the Excel files you share with them.
If you still don’t have a OneDrive account, you can create one right now. This service is simple, free and definitely worth your attention since most of the applications of the Microsoft Office 2013 suite (not only Excel) support OneDrive. After registering, follow these steps:
1. Sign in to your Microsoft account
Make sure you’re signed in to your Microsoft account from Excel 2013. Open your Excel workbook and look in the top right corner. If you see your name and photo there, then proceed to the next step, otherwise click Saini ese j (Fa'aofi).
Excel will display a window asking you to confirm that you really want to allow Office to connect to the Internet. Click ioe (Yes) and then enter your Windows Live account information.
2. Save your excel sheet to the cloud
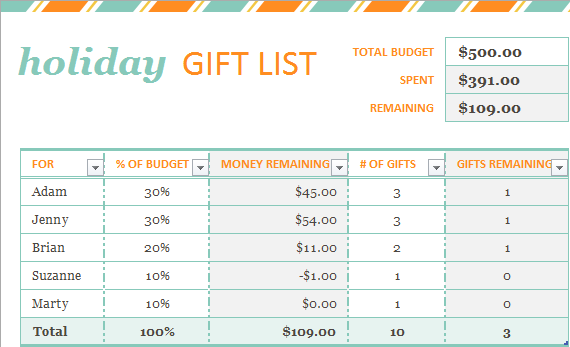
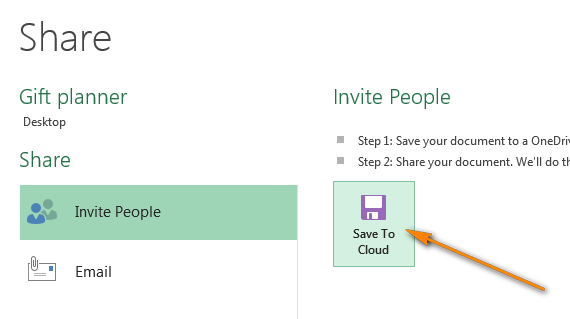
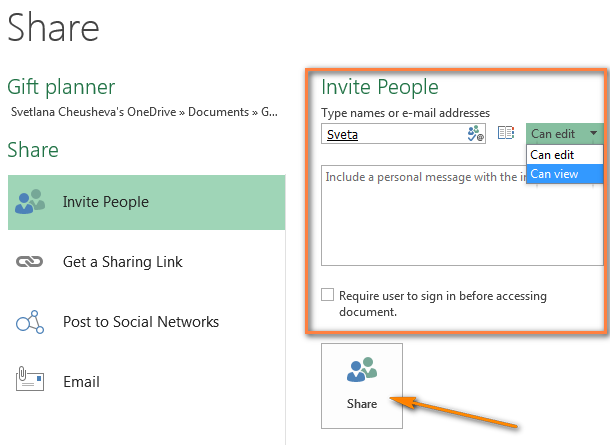
Make sure, for your own peace of mind, that the desired workbook is open, that is, exactly the one that you want to share on the Internet. I want to share a book Holiday Gift Listso that my family members and my friends can watch it and help 🙂
With the workbook open, go to the tab Fillet (Faila) ma kiliki Faasoa atu (Sharing) on the left side of the window. The default option will be Valaaulia Tagata (Invite other people), then you need to click Save To Cloud (Save to Cloud) on the right side of the window.
After that, choose a location to save the Excel file. OneDrive is listed first on the left and is selected by default. You just have to specify the folder to save the file in the right part of the window.
Manatua: If you don’t see the OneDrive menu item, then you don’t have a OneDrive account, or you’re not signed in to your account.
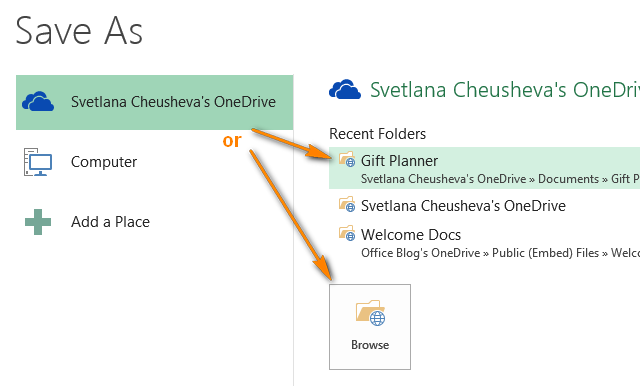
I have already created a special folder Gift Planner, and it is shown in the recent folders list. You can select any other folder by clicking the button vaega (Overview) below area Folders lata mai (Recent folders), or create a new folder by right-clicking and selecting from the context menu fou (Create) > Failautusi (folder). When the desired folder is selected, click Sefe (Faasaoina).
3. Sharing an Excel Sheet Saved on the Web
Your Excel workbook is already online and you can view it in your OneDrive. If you need to share Excel sheets saved on the Internet, then you just have to take one step – choose one of the methods offered by Excel 2013 for sharing:
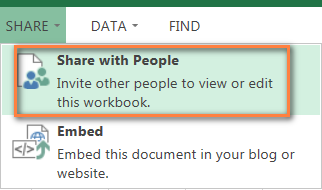
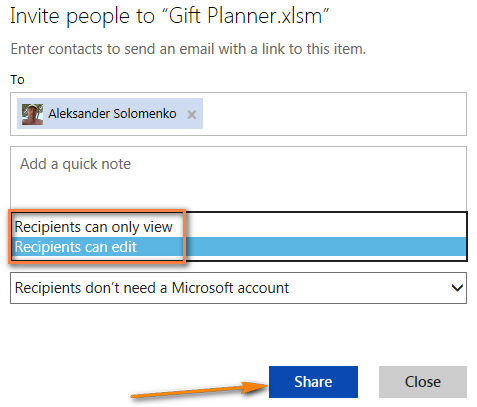
- Valaaulia Tagata (Invite other people). This option is selected by default. Simply enter the email address of the contact(s) you want to share the Excel sheet with. When you start typing it, Excel’s autocomplete will compare the data you entered with the names and addresses in your address book and show you a list of matching options to choose from. If you want to add multiple contacts, enter them separated by semicolons. In addition, you can use the search for contacts in the address book, to do this, click the icon Search Address Book (Search in the address book). You can set the access rights for viewing or editing by selecting the appropriate option from the drop-down list on the right. If you specify multiple contacts, then the permissions will be set to the same for everyone, but later you can change the permissions for each person individually. You can also add a personal message to the invitation. If you don’t enter anything, Excel will add the general prompt for you.
Finally, you need to choose whether the user must be logged into their Windows Live account in order to access your online Excel sheet. I don’t see any particular reason for forcing them to do this, but it’s up to you.
When everything is ready, press the button Faasoa atu (General access). Each invitee will receive an email containing a link to the file you have shared. To open your Excel sheet online, the user just needs to click on the link

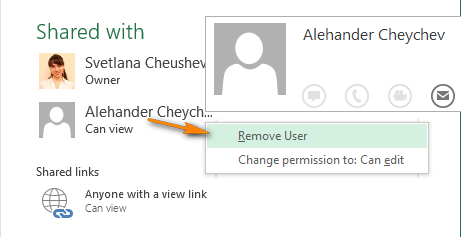
Ina ua uma ona fetaomi le Faasoa atu (Share), Excel will display a list of contacts you have shared the file with. If you want to remove a contact from the list or change permissions, right-click on the name of this contact and select the appropriate option from the context menu.
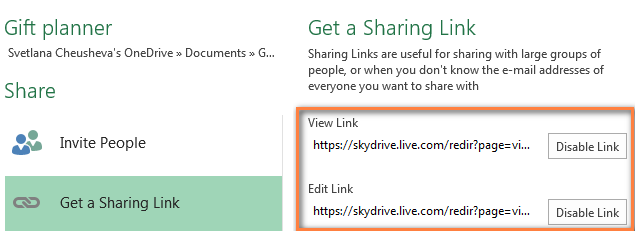
- Get a Sharing Link (Get the link). If you want to give access to an online Excel sheet to a large number of people, then a faster way is to send them a link to the file, for example, through an Outlook mailing list. Choose an option Get a Sharing Link (Get Link) on the left side of the window, two links will appear on the right side of the window: Vaʻai Link (Link to View) and Edit Link (Link for Editing). You can submit one or both of them.
- Post to Social Networks (Post to Social Media). The name of this option speaks for itself and hardly requires additional explanations, except for one remark. If you choose this method, you will not find a list of available social networks in the right part of the window. Click the link Click here to connect social networks (Add social networks) to add your accounts to Facebook, Twitter, Google, LinkedIn, etc.
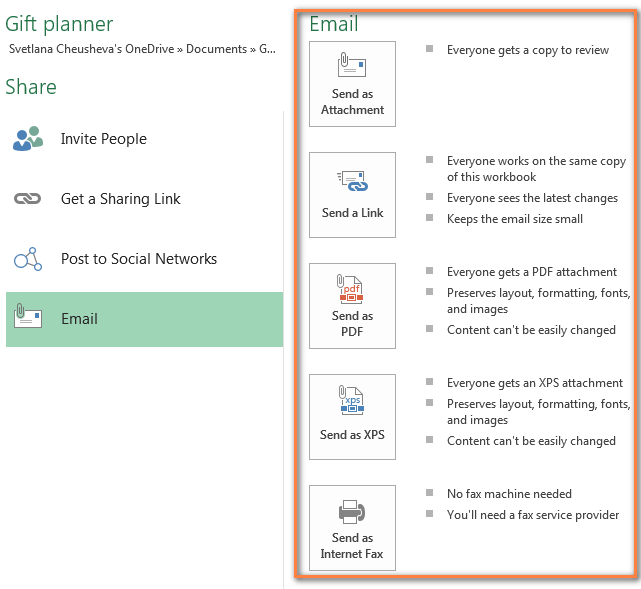
- Email (Send by email). If you want to send the Excel workbook as an attachment (as a regular Excel, PDF or XPS file) or via Internet Fax, select this method on the left side of the window and the appropriate option on the right side.

Fautuaga: If you want to limit the area of an Excel workbook that is viewable by other users, open on the tab Fillet (Faila) vaega Faʻamatalaga (Details) and press Browser View Options (Browser View Options). Here you can configure which sheets and which named elements can be displayed on the web.
That’s all! Your Excel 2013 workbook is now online and available to selected users. And even if you don’t like to collaborate with anyone, this method will allow you to access Excel files from anywhere, whether you are in the office, working at home or traveling somewhere.
Work with workbooks in Excel Online
If you are a confident inhabitant of the Cloud Universe, then you can easily master Excel Online during your lunch break.
How to create a workbook in Excel Online
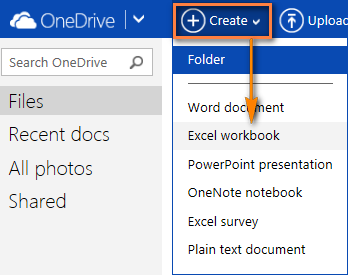
To create a new book, click the little arrow next to the button faia (Create) and select from the drop-down list Excel workbook (Excel Book).
To rename your online book, click on the default name and enter a new one.

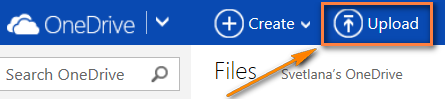
To upload an existing workbook to Excel Online, click Uta i totonu (Upload) on the OneDrive toolbar and select the desired file saved on your computer.
How to edit workbooks in Excel Online
After you open a workbook in Excel Online, you can work with it using Excel Web App (just like with Excel installed on a personal computer), i.e. enter data, sort and filter, calculate using formulas, and visualize data using charts.
There is only one significant difference between the web version and the local version of Excel. Excel Online doesn’t have a button Sefe (Save) because it saves the workbook automatically. If you change your mind, click Ctrl + Zto cancel the action, and Ctrl + Yto redo the undone action. For the same purpose, you can use the buttons faʻalelei (Cancel) / Redo (Return) tab Itulau Amata (Aiga) i le vaega faʻalelei (Faaleaogaina).
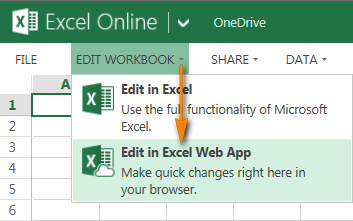
If you are trying to edit some data, but nothing happens, then most likely the book is open in read-only mode. To enable edit mode, click Faʻatonutonu Tusitusiga (Edit Book) > Edit in Excel Web App (Edit in Excel Online) and make quick changes right in your web browser. To access more advanced data analysis features such as PivotTables, Sparklines, or to link to an external data source, click Edit in Excel (Open in Excel) to switch to Microsoft Excel on your computer.
When you save a sheet in Excel, it will be saved where you originally created it, that is, in the OneDrive cloud storage.
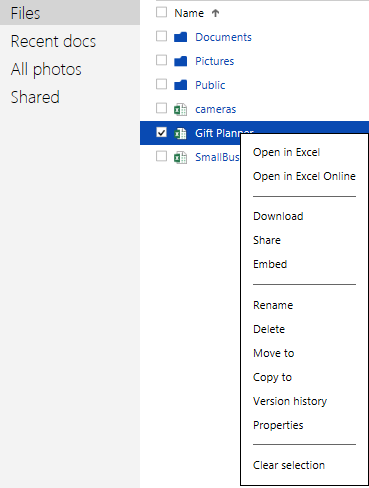
Fautuaga: If you want to make quick changes to several books, then the best way is to open the list of files in your OneDrive, find the book you need, right-click on it and select the desired action from the context menu.
To share your worksheet in Excel Online, click Faasoa atu (Shared) > Share with People (Share) …
… and then choose one of the options:
- Valaaulia Tagata (Send access link) – and enter the email address of the people you want to share the book with.
- Maua se sooga (Get link) – and attach this link to an email, post it on a website or on social networks.
You can also set access rights for contacts: the right to view only or give permission to edit the document.
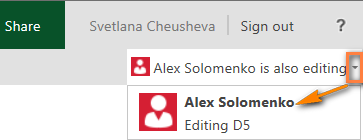
When multiple people are editing a worksheet at the same time, Excel Online immediately shows their presence and updates made, provided that everyone is editing the document in Excel Online and not in local Excel on the computer. If you click on the little arrow next to the person’s name in the top right corner of the Excel sheet, you can see exactly which cell that person is currently editing.
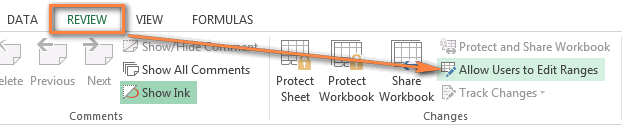
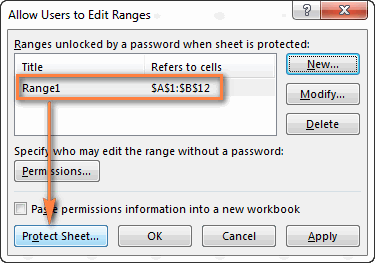
If you’re sharing online worksheets with your team, you might want to give them permission to edit only certain cells, rows, or columns in your Excel document. To do this, in Excel on the local computer, you need to select the range (s) that you allow editing, and then protect the worksheet.
- Select a range of cells that your users can edit, open the tab toe iloilo (Toe Iloilo) ma i le vaega suiga (Changes) click Fa'ataga Tagata Fa'aoga e Fa'asa'o Va'aiga (Allow changing ranges).
- I le pusa talanoa Fa'ataga Tagata Fa'aoga e Fa'asa'o Va'aiga (Allow changing ranges) click the button fou (Create), make sure the range is correct and click Puipui Pepa (Protect sheet). If you want to allow your users to edit multiple ranges, then click the button again. fou (Faia).
- Enter your password twice and upload the secure sheet to OneDrive.
For more information about this, please read the article Locking and unlocking specific areas of a protected sheet.
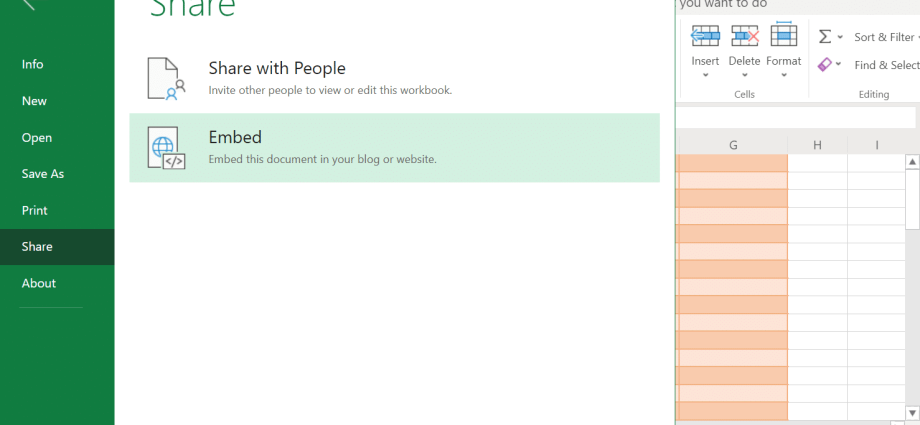
How to Embed an Excel Sheet in a Website or Blog
If you want to publish your Excel workbook to a website or blog, follow these 3 easy steps in Excel Web App:
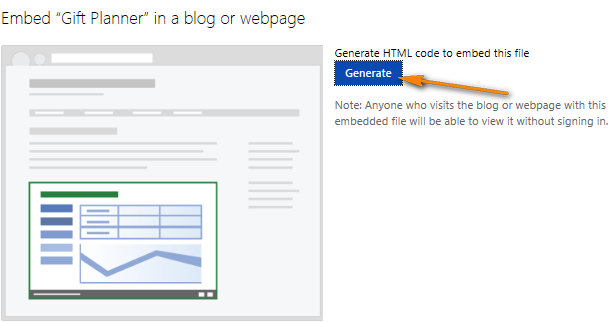
- Open a workbook in Excel Online, click Faasoa atu (Shared) > teuloto (embed), then click the button gaosi (Faia).
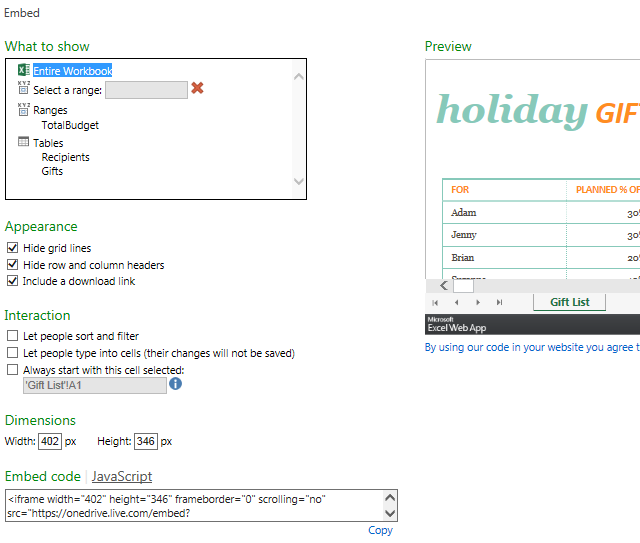
- In the next step, you define exactly how the sheet should look on the web. The following options are available to you:
- What to show (What should be shown). In this section, you can specify whether you want to embed the entire workbook or just a part of it, such as a range of cells, a pivot table, and so on.
- Faʻaaliga (Appearance). Here you can customize the appearance of the book (show or hide grid lines, column and row headings, include a download link).
- Fegalegaleaiga (Interaction). Allow or not allow users to interact with your table – sort, filter and enter data into cells. If you allow data entry, then changes made by other people in cells on the Internet will not be saved in the original workbook. If you want a specific cell to be opened when opening a web page, check the box Always start with this cell selected (Always start from this cell) and click the desired cell in the area tofo (Preview), which is located on the right side of the dialog box.
- fua (Dimensions). Enter here the width and height of the table window in pixels. To see the actual dimensions of the window, click View actual size (actual view size) above the window tofo (Preview). Remember that you can set the size to be at least 200 x 100 pixels and at most 640 x 655 pixels. If you need to get a different size that goes beyond these limits, then later you can change the code in any HTML editor, directly on your site or blog.
- Pau lava le mea e tatau ona e faia o le kiliki ata (Copy) below section Faʻailoga le code (embed code) and paste the HTML (or JavaScript) code into your blog or website.
Manatua: The embed code is an iframe, so make sure your site supports this tag and your blog allows it to be used in posts.
Embedded Excel Web App
What you see below is an interactive Excel sheet that demonstrates the described technique in action. This table calculates how many days are left until your next birthday, anniversary, or some other event, and colors the gaps in various shades of green, yellow, and red. In Excel Web App, you just need to enter your events in the first column, then try changing the corresponding dates and see the results.
If you are curious about the formula used here, please see the article How to set conditional date formatting in Excel.
Fa'amatalaga a le Faaliliu: In some browsers, this iframe may not display correctly or not at all.
Mashups in Excel Web App
If you want to create a closer interaction between your Excel websheets and other web apps or services, you can use the JavaScript API available on OneDrive to create interactive mashups from your data.
Below you can see the Destination Explorer mashup created by the Excel Web App team as an example of what developers can create for your website or blog. This mashup uses the Excel Services JavaScript and Bing Maps APIs to help site visitors choose a route to travel. You can select a location on the map and the mashup will show you the weather at that location or the number of tourists visiting those locations. The screenshot below shows our location 🙂

As you can see, working in Excel Online is extremely simple. Now that we’ve covered the basics, you can continue to explore its features and work with your sheets with ease and confidence!