


Mataupu
I se faaupuga: Learn how to create an interactive bar chart (or distribution plot) so that it displays more information when you select a specific column.
Tulaga faigata: avefeʻau.
Interactive bar chart
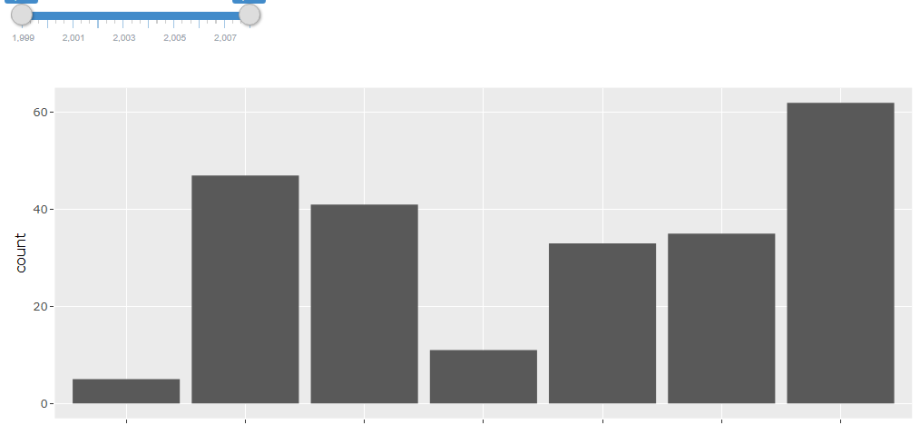
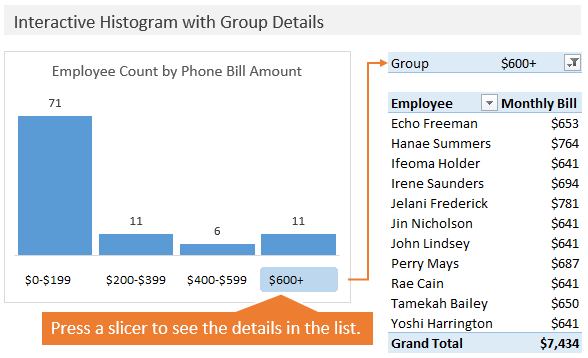
This is what the finished histogram looks like:
Display additional information when a specific column is selected
The distribution histogram is good because it allows you to quickly understand how the available data is dispersed in the general mass.
In our example, we are looking at employee phone bill data for a month. The bar chart collects employees into groups based on the size of the account and then shows the number of employees in each group. The chart above shows that 71 employees had a monthly phone bill between $0 and $199.
In addition, we see that 11 employees had a phone bill that exceeded $600 per month. Blimey! This is what happens when you spend a lot of time on Facebook! 🙂
The question immediately arises:Who are these people with such huge bills???»
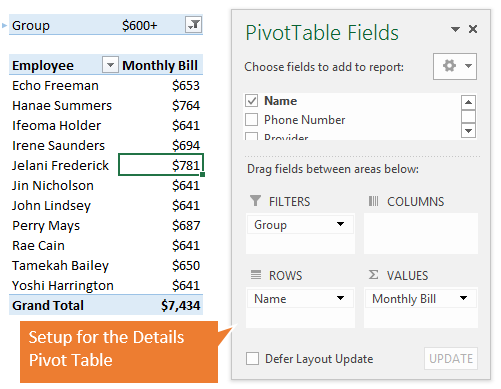
The PivotTable to the right of the chart shows the names of the employees and the value of their bill for the month. The filter is created using slicers and configured to show only those employees who belong to the selected group in the list.
How does this chart work?
The slicer with group boundaries is indicated above the labels of the horizontal axis of the chart. As a result, it looks like it’s the horizontal axis labels, but it’s actually just a slice.
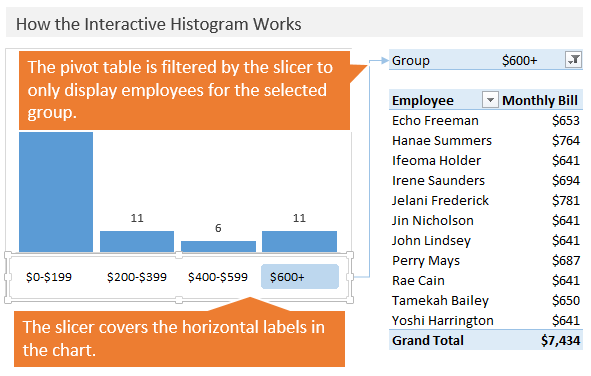
The slicer is linked to the PivotTable on the right and starts filtering on the group name. Region Lalo (Rows) of this pivot table contains the names of the employees, and the area O tulaga faatauaina (Values) – the value of the account.
Fa'amatalaga muamua
The initial data contains a separate line for each employee with information about the employee and the size of his account. In this form, the data is usually provided by telephone companies.
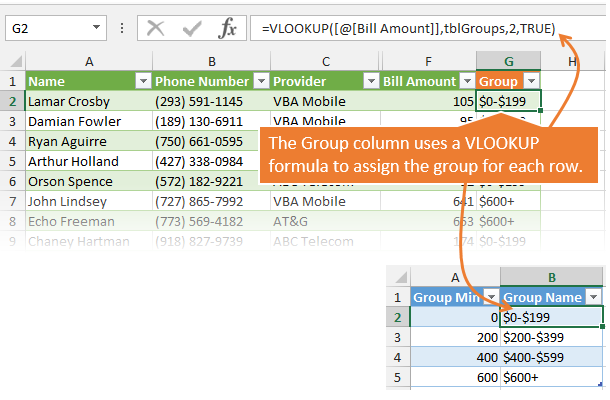
In the column G table is a function VPR (VLOOKUP) which returns the name of the group. This formula looks up a value from a column Bill Amount i le laulau tblGroups ma toe faafoi le tau mai le koluma igoa kulupu.
Note that the last function argument VPR (VLOOKUP) equal MONI (TRUE). This is how the function will look at the column Group Min looking for a value from a column Bill Amount and stop at the nearest value that does not exceed the desired value.
In addition, you can create groups automatically using pivot tables without resorting to using the function VPR (VLOOKUP). However, I like to use VPR (VLOOKUP) because this feature gives you more control over group names. You can customize the group name format as you like and control the boundaries of each group.
In this example, I’m using Excel tables to store the source data and for the lookup table. It’s not hard to see that formulas also refer to tables. In this form, formulas are much easier to read and write. It is not necessary to use Excel spreadsheets to do this kind of work, this is just my personal preference.
Histogram and PivotTable
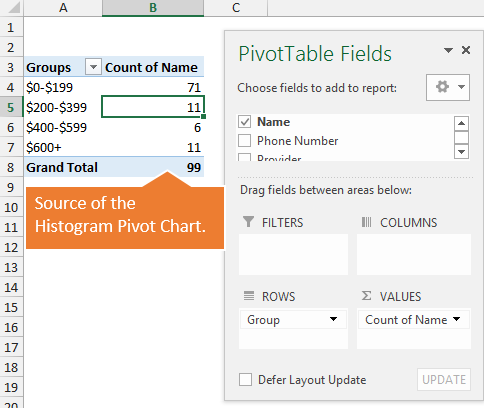
This figure shows the PivotTable used to create the bar chart. Region Lalo (Rows) contains the group names from the column AUA tables with source data, and the area O tulaga faatauaina (Values) contains the values from the column Count of Name. Now we can show the distribution of employees in the form of a histogram.
Pivot table with additional information
The PivotTable, located to the right of the chart, shows additional information. In this pivot table:
- Eria Lalo (Rows) contains the names of employees.
- Eria O tulaga faatauaina (Values) contains the monthly phone bill.
- Eria filiga (Filters) contains group names.
The group list slicer is linked to the PivotTable so that only names from the selected group will be displayed. This allows you to quickly display a list of employees included in each group.
Assembling the whole from the parts
Now that all the components have been created, all that’s left is to set up the formatting of each element so that it all looks nice on the page. You can customize the slicer style to make it look neater on top of the chart.
What else can we use this technique for?
In this example, I used data on the telephone bills of employees. Similarly, any type of data can be processed. Histograms are great because they allow you to quickly get information about the distribution of data, but often you need to get more detailed information about a single group. If you add additional fields to the pivot table, you can see trends or analyze the resulting data sample even deeper.
Leave your comments and ask any questions. Interested to know how you use or plan to use the technique shown?
Faafetai!